Here you’ll find a ros2router tutorial that was a bit tailored towards the Competition. It may not be 100% applicable to the current setup as it was written a couple of setup-changes ago but we think that it still may be somewhat helpful.
Connecting to the On‑Site Participant VM from Your Laptop
System Architecture
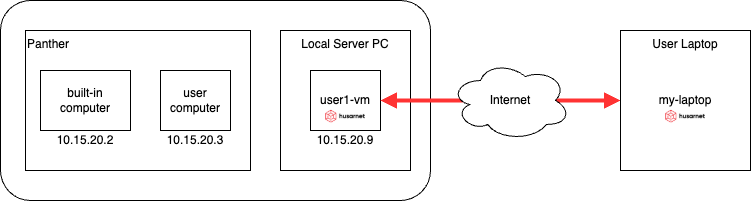
The diagram shows three key components:
user1-vm– your virtual machine running on the ERC on‑site network- Panther – the physical robot on the same on‑site LAN
my‑laptop– your personal computer, connected through Husarnet VPN
A ROS 2 Router (running in Docker on user1‑vm) forwards only selected topics between the on‑site LAN (enp6s19) and the Husarnet overlay network (hnet0).
1 Prepare the On‑Site VM (user1‑vm)
1.1 Tune the kernel for large DDS packets
# increase socket buffers
sudo sysctl -w net.core.wmem_max=12582912
sudo sysctl -w net.core.rmem_max=12582912
sudo sysctl -w net.core.wmem_default=16384000
sudo sysctl -w net.core.rmem_default=16384000

# avoid IP fragmentation issues
sudo sysctl -w net.ipv4.ipfrag_high_thresh=134217728   # 128 MB
sudo sysctl -w net.ipv4.ipfrag_time=3
sudo sysctl -w net.ipv6.ip6frag_high_thresh=134217728  # 128 MB
sudo sysctl -w net.ipv6.ip6frag_time=3

# adapt Husarnet interface
sudo ip link set dev hnet0 txqueuelen 500
sudo ip link set dev hnet0 mtu 1350
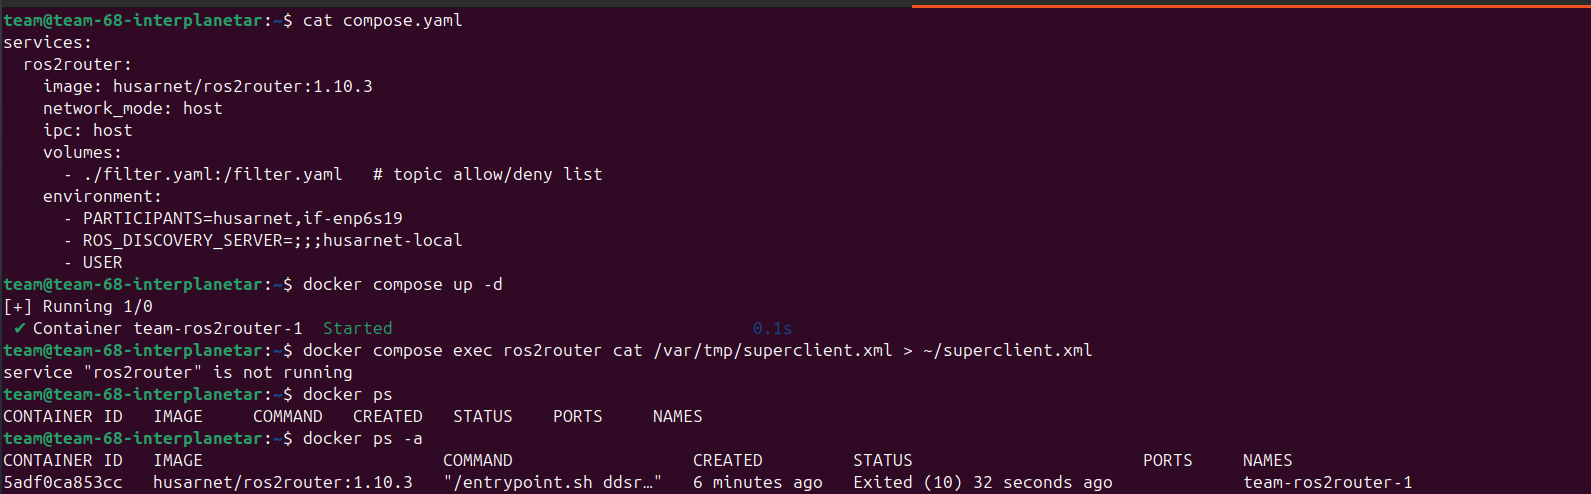
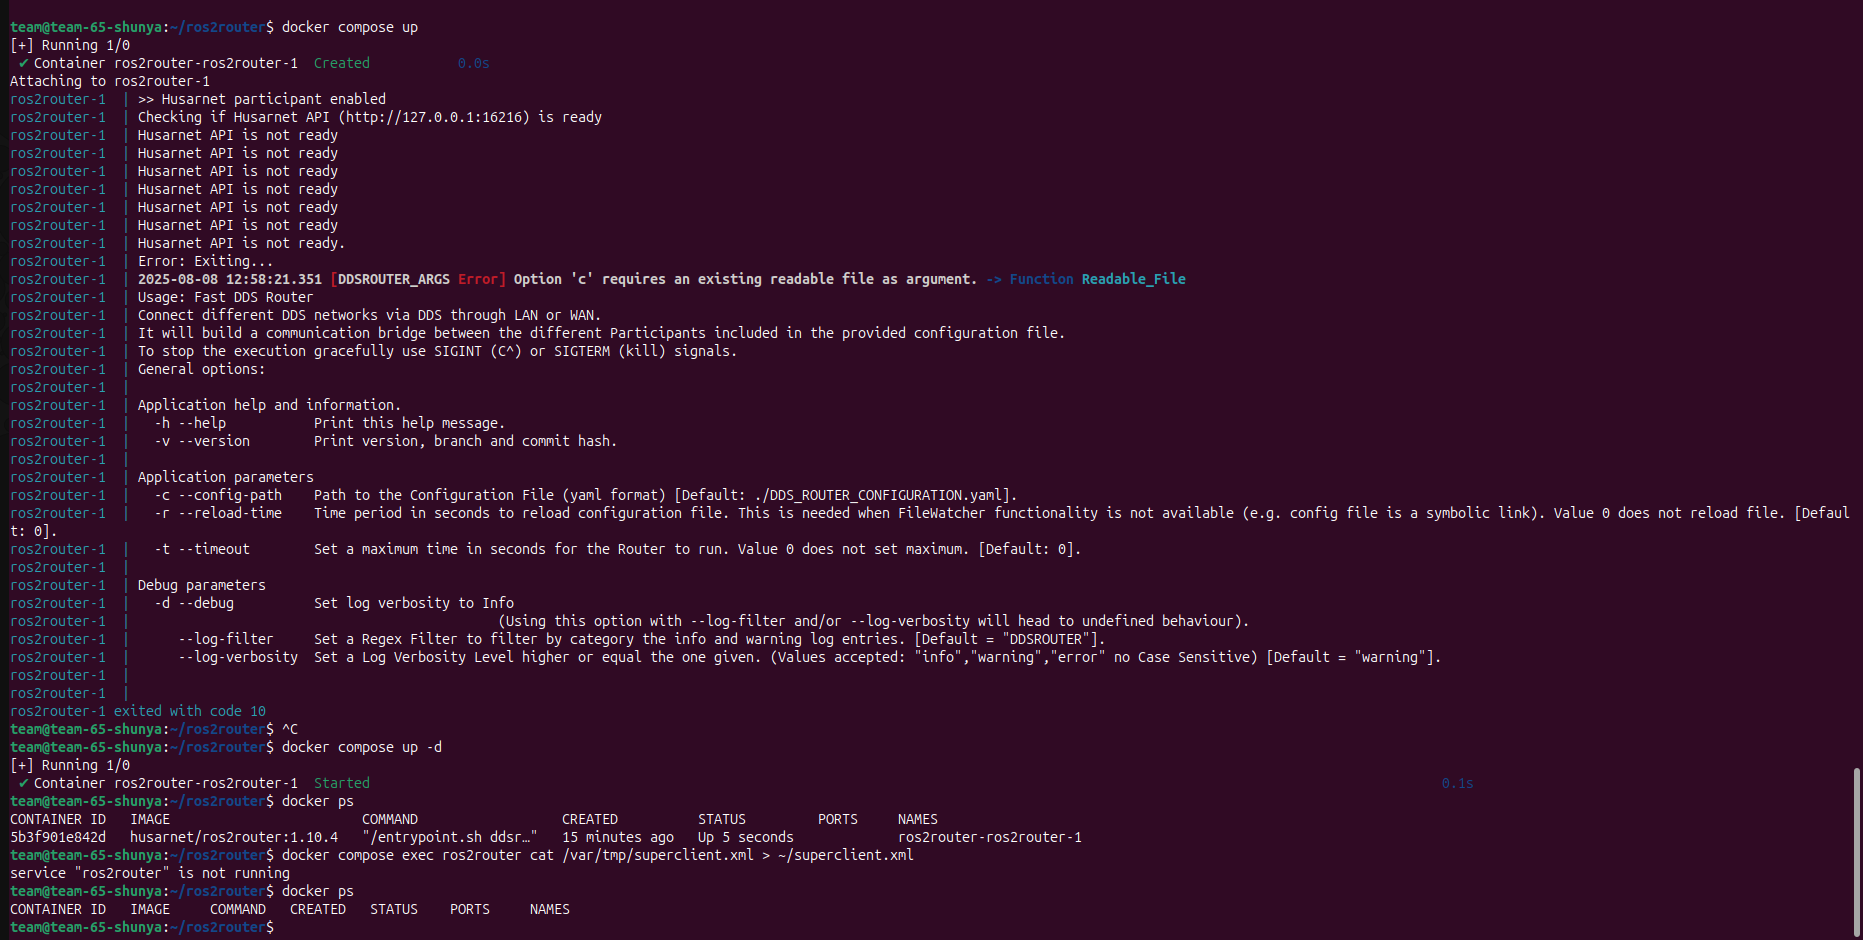
1.2 Start the ROS 2 Router container
Create compose.yaml in your home directory:
services:
  ros2router:
    image: husarnet/ros2router::1.10.3
    network_mode: host
    ipc: host
    volumes:
      - ./filter.yaml:/filter.yaml   # topic allow/deny list
    environment:
      - PARTICIPANTS=husarnet,if-enp6s19
      - ROS_DISCOVERY_SERVER=;;;husarnet-local
      - USER
default filter.yaml is generated automatically (see below) and can be edited whenever you want to adjust the topic list—remember to restart the container afterward.
Generate a filter that allows everything:
ros2 topic list | xargs ./create_filter.sh > filter.yaml
Launch the router:
docker compose up -d
1.3 Export the Fast DDS “super‑client” profile
docker compose exec ros2router cat /var/tmp/superclient.xml > ~/superclient.xml
You will copy this file to your laptop in the next phase.
1.4 Configure Cyclone DDS for local traffic
Save the following as ~/cyclonedds.xml:
<?xml version="1.0" encoding="utf-8"?>
<CycloneDDS xmlns="https://cdds.io/config" xmlns:xsi="http://www.w3.org/2001/XMLSchema-instance" xsi:schemaLocation="https://cdds.io/config https://raw.githubusercontent.com/eclipse-cyclonedds/cyclonedds/master/etc/cyclonedds.xsd">
  <Domain Id="any">
    <General>
      <Interfaces>
        <NetworkInterface name="enp6s19" />
      </Interfaces>
    </General>
  </Domain>
</CycloneDDS>
Apply it:
export RMW_IMPLEMENTATION=rmw_cyclonedds_cpp
export CYCLONEDDS_URI=$HOME/cyclonedds.xml
ros2 daemon stop      # forces re‑discovery
2 Prepare Your Laptop (my‑laptop)
2.1 Apply the same kernel tuning
Repeat the Tune the kernel commands from step 1.1:
# increase socket buffers
sudo sysctl -w net.core.wmem_max=12582912
sudo sysctl -w net.core.rmem_max=12582912
sudo sysctl -w net.core.wmem_default=16384000
sudo sysctl -w net.core.rmem_default=16384000

# avoid IP fragmentation issues
sudo sysctl -w net.ipv4.ipfrag_high_thresh=134217728   # 128 MB
sudo sysctl -w net.ipv4.ipfrag_time=3
sudo sysctl -w net.ipv6.ip6frag_high_thresh=134217728  # 128 MB
sudo sysctl -w net.ipv6.ip6frag_time=3

# adapt Husarnet interface
sudo ip link set dev hnet0 txqueuelen 500
sudo ip link set dev hnet0 mtu 1350
2.2 Enable Fast DDS with the router profile
Copy superclient.xml from user1‑vm to ~/superclient.xml on your laptop, then run:
export RMW_IMPLEMENTATION=rmw_fastrtps_cpp
export FASTRTPS_DEFAULT_PROFILES_FILE=$HOME/superclient.xml
ros2 daemon stop
After a few seconds you should discover every topic that the router exposes, giving you transparent access to Panther and the on‑site VM.
That’s it!
You can now launch your local ROS 2 nodes and interact with the on‑site robot just as if everything were on the same LAN.